Living in a house for a long time can give rise to mould across different parts of the house. Moulds are common in the kitchen and in the bathroom. These must be properly cleared before you move out of the house. Not cleaning the mould properly can lead to a deduction in the bond deposit. The most common places for mould to occur are near or around the shower screens, on grout lines, and many other places where water is likely to sit. The mould does not look good and can make your bathroom unhygienic.
In this blog, we will talk about how to Clean Bathroom Mould Before a Rental Inspection
First Locate Where the Mould is Growing
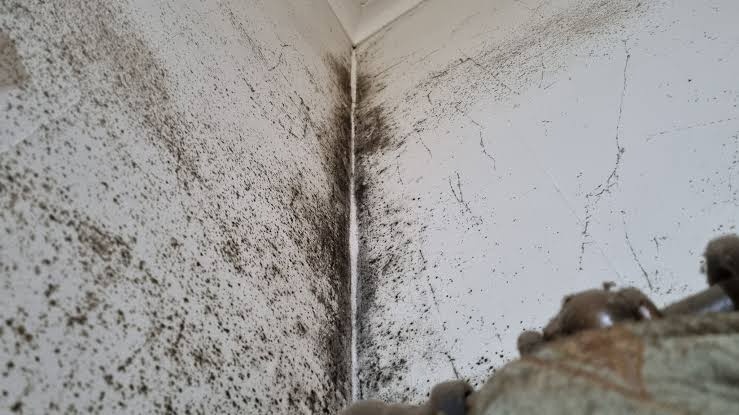
First, do not get straight down and just start scrubbing what you can see. Be thorough in your search – mould can be hiding and growing throughout your bathroom. Property looks in corners and then starts scrubbing them off.
And check the following:
- The walls of the shower/grout line
- behind, around and inside the bathroom silicone
- the very corners of the ceiling where walls and ceilings meet
- window frames and sills
- behind toilet pans
- toilet cisterns and taps and wash basins
- at the entrance to the exhaust fan and inside the fan
- Behind and possibly even along your shower curtains and floor mats.
Mould loves it wet and tends to want to take up residence in the same spot so locating the nest will definitely avoid repeated treatments in the future.
Ventilate first
Prior to cleaning, make sure there is adequate ventilation in the bathroom, opening windows and doors where appropriate, and turning on the exhaust fan. Increased ventilation can assist in decreasing moisture, making the bathroom easier to keep clean.
If there is a problem with air circulation, leave the exhaust fan on throughout and for a short time following your shower. Wiping down wet surfaces after your bath can help limit the excess moisture, which may lead to the production of mould.
How to clean small areas of surface mould
Use a suitable commercial mould cleaner to treat a small area of surface mould, following its instructions very carefully. Do not do it with your hands directly. Make sure to wear good-quality gloves to avoid any reaction on the skin. Directly spill or use the chemical prost on the mould and let it sit there for some time to see the effect of the chemical on the mould. The final step includes the proper scrubbing of the area with a scrub to properly clean the area.
Do not rub the paint with a harsh material, as it can chip off the paint.
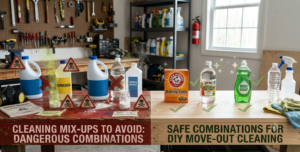
Only use the proper chemical that is used to clean the mould. Mixing the detergents and other chemicals in your household can cause a poisonous reaction and can harm the members.
Check the Grout and Silicone
The grout lines and the seals around the silicone can get mucky and often provide a breeding ground for mould because the moisture gets trapped there. Make sure you find a good mould cleaning spray and using a smaller brush, get it into the grout lines. If the mould gets into the silicone seal and is refusing to come out, even after spraying with mould cleaner, it may just be that the seal itself needs replacing, rather than keep on spraying and spraying. Tenants should usually refrain from replacing fixtures and permanent fixtures unless told to do so by the property manager/landlord.
Don’t Scratch the Ceiling at All
Moulds that are not cleaned can later turn into black spots on the ceiling and walls. This can chip off the paint and degrade the quality of the wall. When washing this, do not shower your ceilings: Apply mold remover to the affected areas following directions in the packaging with gentle pressure. If mold on your ceiling causes bubbly paint, water spot discoloration, soft areas, or widespread patches, there may be another, even bigger leak, or a constant moisture problem occurring — consult your landlord.
And Don’t Forget Other Parts of the Bathroom
Rental inspection isn’t just about killing mould spores. So after dealing with mould, you must give the rest of the bathroom a good once-over.
- Scrubbed the shower floor
- scrubbed the loo
- Wiped down the vanity
- Cleaned soap scum from tiles
- cleaned all the mirrors
- Wash the floor
- Empty bin
Work from the ceiling down to the floor, and don’t ignore easy-to-miss corners or edges. A clean and dry bathroom leaves a much better impact than a damp one during an inspection.
Stop Mould Getting Back
Don’t assume that mould is gone for good and that you have cleaning done. It’s vital the job doesn’t need doing again anytime soon. Make sure to always exhaust the moisture from hot air in the bathroom to prevent any mould from reappearing. Keeping your bathroom dry can help you prevent mould buildup. You may even need to consider whether the extractor fan is functioning correctly if ventilation looks insufficient or a leak persists; then consider telling the landlord immediately.
When the mould needs professional intervention
There are some mould build-ups that need professional cleaning assistance. If there’s extensive mould, it keeps coming back shortly after you’ve cleaned it, there are signs of a water leak, or you suspect the mould is located within the walls or ceiling, there might be an issue with maintenance and repairs.
Snap photos of areas of heavy mould growth or water damage to present to the property manager. This should be discussed in line with your tenancy agreement, and demonstrate that this looks like a repair issue rather than simple maintenance.
Final Bathroom Checklist
At this stage, go through the bathroom again – check against any Rental Inspection Checklists out there. You want to make sure that the ceiling grout, silicone around the shower, shower screen, floors, vanity, toilet, mirrors, windows, corners and all other areas have been thoroughly cleaned. Dry off surfaces, take out the rubbish, lay the towels, air it out and do a final comb of the areas.
Summary
Getting rid of mould in the bathroom will make sure your rental apartment doesn’t look like it’s in disarray, so there are benefits to dealing with it before inspection time. You need to remember to use safe methods, ensure ventilation of the space, use moisture solutions, and perform a detailed cleaning in your bathroom. If the area covered by mould is too large, or it has to do with a plumbing leak or building humidity problems, it’s best not to hide anything, but to notify the concerned parties about this situation. Ensure your apartment’s bathroom is clean, fresh and ventilated, and ready for the inspectors.
The bond cleaning Brisbane provides the highest quality bond cleaning and mould cleaning services at reasonable prices. Feel free to learn more about the services provided.
Contact details
Company Name – The Bond Cleaning Brisbane
Working Hours
Mon – Fri: 08.00 am – 10.00 pm Saturday: 08.00 am – 02.00 pm Sunday: Closed
Contact – +61435144336
E-mail – info@thebondcleaningbrisbane.com.au
Frequently Asked Questions
1. How do I scrub mould off bathroom grout prior to a rental inspection?
Buy an appropriate mould cleaner and gently wipe away any mould with a brush. Once cleaned, rinse the grout and dry with a towel.
2. Can the mould in my bathroom affect the rental inspection?
If present, mould does make bathrooms appear unhygienic and can highlight that the ventilation needs attention.
3. How do I get bathroom mould to stay away?
Ventilate the room, using your shower fan, towel-drying walls, floors and showers immediately post-shower, ensure that the bathroom is dry after use
4. Do I tell my landlord or property manager about mould in the bathroom?
Yes, if it is significant, recurrent and possibly linked to plumbing issues or poor ventilation
5. Is it safe to use a bleach-based cleaner to treat the bathroom mould?
Use as indicated for that specific cleaning product and never mix bleach or cleaners
6. What are the areas in a bathroom to look for mould prior to inspection?
Showers, bathrooms, silicone, grout, shower screen glass, floors, roof lines, around windows and exhaust
“`html “`